Cozy Spicy Tuna Rice Balls: A Nostalgic Snack
There’s something incredibly satisfying about the simple pleasure of a well-made rice ball. Whether it’s snuggled up on a rainy afternoon or packed into a lunch for a cozy picnic, Spicy Tuna Rice Balls remind me of carefree days spent at home, wrapped in the warm embrace of love and comfort. The creamy, spicy filling contrasts beautifully with tender sushi rice, capturing a delightful taste of home that’s perfect for any occasion.
Inspired by my childhood memories of creating homemade snacks with my family, these rice balls have become a staple in my kitchen—especially during those busy weeks when I crave a fulfilling, easy weeknight dinner. They’re quick to assemble, fun to customize, and can even make for a delightful appetizer when entertaining friends. This is one you’ll definitely want to pin for later!
Why You’ll Love This Recipe
- Quick and Easy: Perfect for a busy weeknight when you want something delicious without a lot of fuss.
- Customizable: You can swap in different fillings or toppings to suit your taste and preferences.
- Family-Friendly: Involve the kids in the assembly for a fun family activity—and a snack they’ll love.
- Healthy and Satisfying: Packed with protein from tuna and healthy carbs from sushi rice, it’s a nourishing choice.
- Great for Meal Prep: Make a batch over the weekend and enjoy them throughout the week.
Ingredients You’ll Need for Spicy Tuna Rice Ball
To whip up these delightful Spicy Tuna Rice Balls, gather the following ingredients:
- 2 cups sushi rice
- 2 1/2 cups water
- 1 can tuna, drained
- 2 tablespoons Kewpie mayonnaise
- 1 teaspoon sriracha (or to taste)
- Salt, to taste
- Roasted seaweed sheets (nori)
- Sesame seeds (optional)
- Scallions, chopped (optional)
How to Make Spicy Tuna Rice Ball
Let’s dive into the cozy process of making these delicious rice balls together! Follow these simple steps for a delightful snack.
Rinse the sushi rice under cold water until the water runs clear. Combine the rice and water in a rice cooker and cook according to the rice cooker instructions. Once done, let it sit for 10 minutes to achieve the perfect texture.
In a bowl, mix the drained tuna with Kewpie mayonnaise, sriracha, and a pinch of salt to taste. Adjust the spice level to suit your palate—don’t be shy if you love a little heat!
Once the rice is cool enough to handle, wet your hands to prevent sticking. Take a small amount of rice and flatten it in your palm, enjoying the delightful, sticky texture.
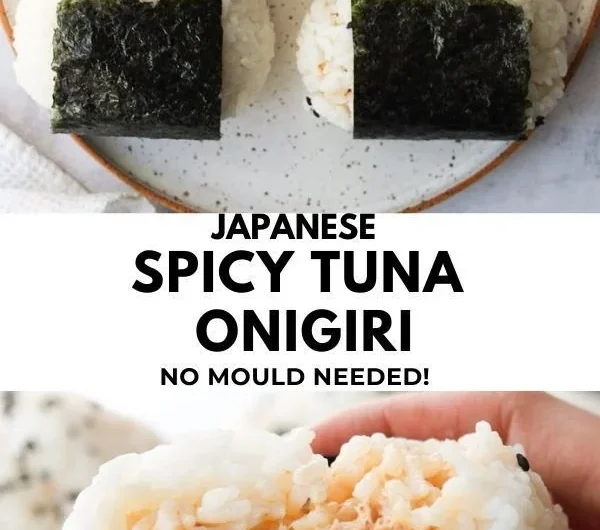
Place a spoonful of the spicy tuna mixture in the center, then mold the rice around it to form a triangle-shaped ball. Don’t worry if they aren’t perfectly shaped; each one is unique!
Wrap each onigiri with a strip of roasted seaweed. Optionally, sprinkle with sesame seeds or chopped scallions for an extra layer of flavor and texture. Enjoy your homemade spicy tuna rice balls as a snack or a meal!
Fun Ways to Customize It
One of the best parts about this recipe is its versatility! Here are some delicious variations you can try for your Spicy Tuna Rice Balls:
- Avocado Addition: Add creamy avocado to your spicy tuna mixture for a rich and indulgent flavor that balances the heat beautifully.
- Zesty Citrus: Incorporate a splash of lime or lemon juice into the tuna mix for a refreshing and bright twist.
- Sweet Chili: Swap out the sriracha for sweet chili sauce for a milder, sweet-spicy flavor that’s wonderfully addictive.
- Crispy Onions: Top your rice balls with crispy fried onions for an added crunch and deep, savory flavor.
Chef Emma’s Helpful Tips
To make your rice ball-making experience even smoother, here are a few tips from my own kitchen:
Make-Ahead Advice: These Spicy Tuna Rice Balls can be made ahead and stored in the fridge for 2-3 days. Just wrap them tightly in plastic wrap, and they’ll be ready for a snack attack!
Choosing Sushi Rice: Make sure to use authentic sushi rice for the best texture; it’s stickier compared to other varieties, making it easier to form the rice balls.
Ingredient Swaps: If you don’t have Kewpie mayonnaise, regular mayonnaise will work, but Kewpie adds a unique umami flavor that’s hard to beat!
Slicing Trick: If you enjoy quality time in the kitchen, but want even quicker rice balls, consider using a cookie cutter to shape your rice—this could be a great way to involve kids!
What’s Inside – Nutrition Breakdown
Here’s the nutrition information for each Spicy Tuna Rice Ball, so you know what you’re enjoying:
- Serving Size: 1 rice ball
- Calories: 176
- Carbohydrates: 27g
- Sugar: 0g
- Fat: 6g
- Protein: 7g
- Sodium: 210mg
Frequently Asked Questions
Here are some common questions about making Spicy Tuna Rice Balls:
- Can I make this ahead?: Absolutely! They store well in the refrigerator for 2-3 days.
- Can I use different ingredients?: Yes! Feel free to get creative with your fillings—anything from chicken salad to pickled vegetables can work.
- How do I store leftovers?: Wrap any leftovers tightly in plastic wrap and keep them in the fridge.
- How long does it last?: These rice balls are best enjoyed fresh but can last 2-3 days when stored properly.
Wrapping It Up
There’s a distinct joy in crafting something as simple yet deeply satisfying as Spicy Tuna Rice Balls. They encapsulate the warmth of home cooking and create unforgettable moments with friends and family. Whether you’re preparing for a cozy evening at home or looking for the perfect portable snack, these rice balls are here to bring a dash of comfort to your day.
Save this Spicy Tuna Rice Ball recipe to your easy weeknight dinner board so it’s ready when you need a cozy treat! Happy cooking!

Cozy Spicy Tuna Rice Balls
- Total Time: 45 minutes
- Yield: 4 servings 1x
- Diet: Pescatarian
Description
Quick and easy Spicy Tuna Rice Balls inspired by childhood memories, perfect for snacks or meals.
Ingredients
- 2 cups sushi rice
- 2 1/2 cups water
- 1 can tuna, drained
- 2 tablespoons Kewpie mayonnaise
- 1 teaspoon sriracha (or to taste)
- Salt, to taste
- Roasted seaweed sheets (nori)
- Sesame seeds (optional)
- Scallions, chopped (optional)
Instructions
- Rinse the sushi rice under cold water until the water runs clear. Combine the rice and water in a rice cooker and cook according to the rice cooker instructions. Once done, let it sit for 10 minutes to achieve the perfect texture.
- Mix the drained tuna with Kewpie mayonnaise, sriracha, and a pinch of salt to taste. Adjust the spice level to suit your palate—don’t be shy if you love a little heat!
- Wet your hands to prevent sticking. Take a small amount of rice and flatten it in your palm, enjoying the delightful, sticky texture.
- Place a spoonful of the spicy tuna mixture in the center, then mold the rice around it to form a triangle-shaped ball. Don’t worry if they aren’t perfectly shaped; each one is unique!
- Wrap each onigiri with a strip of roasted seaweed. Optionally, sprinkle with sesame seeds or chopped scallions for an extra layer of flavor and texture. Enjoy your homemade spicy tuna rice balls as a snack or a meal!
Notes
These rice balls can be made ahead and stored in the fridge for 2-3 days. Use authentic sushi rice for best results.
- Prep Time: 15 minutes
- Cook Time: 30 minutes
- Category: Snack
- Method: Cooking
- Cuisine: Japanese
Nutrition
- Serving Size: 1 rice ball
- Calories: 176
- Sugar: 0g
- Sodium: 210mg
- Fat: 6g
- Saturated Fat: 1g
- Unsaturated Fat: 3g
- Trans Fat: 0g
- Carbohydrates: 27g
- Fiber: 1g
- Protein: 7g
- Cholesterol: 30mg